Create Multiple partition on windows 7

One of the problems that user are facing these days are having the single partition on your laptops. These days laptop come with only one drive with whole lot of space and (maybe)one with the backup partition containing recovery data to restore the laptop to its factory setting with all drivers (sometimes hidden). One way to create the partition would be to install the operating system again and create the partition then. But that would not be a sensible way to do it because it takes whole lot of time to do it and installing the OS means you need to install all the software and drivers that came along with your Laptop (preinstalled during the time of purchase) and in some cases drivers are hard to find. Does that mean you are stuck with only one drive? No definitely not. There are others ways around. You can partition your drive into multiple drives without the risk of data loss.

You can create multiple partition in windows 7 or vista based OS with inbuilt partition manager. All you have to do is type ?diskmgmt.msc? on the run window( type windows + r to open run). Right Click on your system partition and click Shrink Volume. Now shrink volume to your desired size. After you shrink the volume there will be unallocated space. Now right click that unallocated partition and select create new volume. Now you can create different size drives on your laptop.

image


imageThe above procedure is for those who don?t want to use or install other software. But if you don?t mind installing other program to create partition( I recommend installing third party software because of the availability of other many functions i.e changing partition from fat to ntfs and so on) you can install a handy and free partition tool called Partition Wizard . This has more features than windows disk management utility and the great thing is its home edition is free to use.

Minitool Partition wizard home edition feature include:

You can download and try it to create as many partition as you want. Make sure you read the warnings, documentation, help carefully before proceeding. Partitioning your hard disk is a serious task and may lead to loss of data when not used or done properly. Better to make copies of V.V.V important documents before proceeding.

Also keep in mind to keep your laptop or pc in continuous power supply the process once begun cannot be halted at the middle and causes the drive to loose data if there is a power failure at the process.

Battery Bar a must have utility for all laptop user

imageIf you are a Laptop user than the Battery bar is the must have utility for you. Apart from showing the estimated time remaining and percentage available it also shows the charge/discharge rate. But One thing I really liked is the Battery Wear. This really helps you to know how much your battery has deteriorated. You can see you battery wear status and be alerted at advance and start using your laptop battery wisely.

The Battery Bar comes with the two version free and the pro. For general purpose the free version should be enough to give the necessary details. You can check the software from this link http://osirisdevelopment.com/BatteryBar/index.html

If you are using the windows 7 or vista then you may get the message ?Consider replacing your battery?. This is usually due to the maximum wear percentage of your battery. If your windows is not showing the time remaining when you are on battery backup then this tool is the must have. This tool even shows the time remaining when the windows stop showing the available time remaining. So have it installed on your laptop or notebooks or netbook before you know its too late.

You can visit the following link to know more about battery. This site gives you clear idea to handle lithium ion battery properly.

http://batteryuniversity.com/learn/article/how_to_prolong_lithium_based_batteries

Have a long life battery. Open-mouthed smile

Hidden Tetris Game in uTorrent

Recently when I was surfing internet, I found that we can play a small Tetris game that?s hidden in uTorrent. All you need to do is open the uTorrent client. Go to the help tab on the top menu bar and click on ?About uTorrent?

image


When the About uTorrent windows opens. Press T.

image

You should now be able to play the Tetris game.

image

ENJOY!!

Network error caused by Kaspersky [Solved]

Many of you might be having the same problem that I faced. I don?t know about the other antivirus software but the Kaspersky was the one that was causing the network trouble. My problem was that whenever I tried to create a ad-hoc network or when I was in my home network through wireless, I could not access my laptop through other computers but other computers were accessible through mine . Of course it was secure but it was frustrating when I could not access my shared folder or file from another PC. All other computer was on the network and file transfer could be done both ways in other computer except my laptop. But I was not having the problem when I connected my laptop through cable. I double checked windows firewall setting manually and allowed all those file sharing and remote connect protocol but that would not solve my problem.

Later I finally figured out what the problem was. When I am at home I connect to my router through wireless. Other computer at my home are connected with cable. So I had my Kaspersky antivirus on automatic settings i.e it would decide what was better for my computer. When I was going through the Kaspersky I found the Kaspersky has a firewall of it?s own that monitors my network apart from my windows 7 firewall. So no matter what was allowed through the windows firewall it was blocked through the Kaspersky firewall.

So what was happened was the Kaspersky antivirus would automatically assign all the wireless network to a public network regardless of windows 7 firewall settings. If you set your wireless network to Homegroup in network and sharing center and the wireless network is in pubic profile in Kaspersky your computer would not be accessible through other computer. So if you are using Kaspersky antivirus and Using wireless devices to connect to each other here?s what you need to do for your computer to be accessible for others.

Step 1

Open up your Kaspersky antivirus. Click on the settings

image

Step 2

Click on the firewall on the left hand side. And click the settings on the right hand side.

image

Step 3

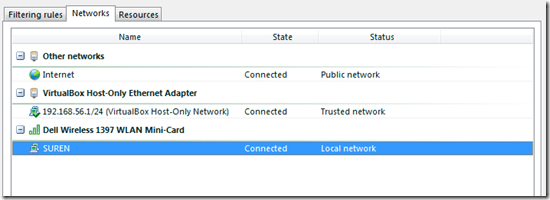
Click on the Networks tab.

This lists all your networks. So in order for your computer to be accessible for file sharing or remote connect purpose the network you are connected must either be a local network or a trusted network. My wireless device ?Dell Wireless 1397 WLAN Mini-Card? connects to a network. In the figure it is now connected to a Network named SUREN. There you can see its status as local network. So be sure to change your network to local or trusted network for a file sharing.

image

This can be done by right clicking the connected network whose profile you want to change.

image

Note: You do not want to change other wireless network to local network. i.e school network or other public network. Doing So can make your computer vulnerable in public areas where others can easily access your shared files.

So that?s all of it. Now all you need to do is make sure that your windows firewall setting are ok for file and printer sharing. If everything is fine you will have a complete networking. Hope this was helpful. Any comments and queries are welcome.

Use FACEBOOK CHAT from the desktop

These days more and more people are into facebook chat. Instead of msn or yahoo or gtalk people are using the facebook chat because most of the people are online on the facebook instead of the other im clients. Though many of you may already have known this I would write it anyway.

Facebook chat can be boring sometimes if you have one too many friends in your chat list. You might use the facebook pop out chat to open the separate window of the facebook chat. But I tell you nothing is better than using a facebook chat from your desktop. You don?t have to go all the way to your browser to open facebook and then use the facebook chat. You can minimize the program and stay online without opening the browser.

I am using PIDGIN for the facebook chat these days. But you can use any other messenger program that support xmpp(Extensible Messaging and Presence Protocol). I like the pidgin as it is simple, free and easy to use.

STEP 1

All you need is the program at first. You can download the program from the pidgin site http://www.pidgin.im/

If you download normally than Pidgin downloads an appropriate version of GTK+ at the time of installation if you don?t have GTK+ installed previously.

But I rather you prefer downloading the offline installation for the link below.

http://sourceforge.net/projects/pidgin/files/Pidgin/pidgin-2.7.3-offline.exe

STEP 2

After you installed the program you need to configure the PIDGIN in order to be able to chat on facebook. Strictly follow the instruction below. This information is provided by the facebook itself.

Open the PIDGIN.

  1. Go to "Accounts" and select "Manage Account."
  2. Create a new account with the following settings:

     Under Basic:
     Protocol: XMPP
     Username: your Facebook username
     Domain: "chat.facebook.com"
     Resource: "pidgin"
     Password: your facebook password
     Local alias: "Facebook Chat"

     Under Advanced:
     Uncheck Require SSL/TLS
     Connect port: 5222
     Connect server: chat.facebook.com
     File transfer Proxies: proxy.eu.jabber.org

To give you the idea this is what it looks like when filled.

UNDER BASIC

image

UNDER ADVANCED

image

If you don?t know what is your username then log on to your facebook. Go to http://www.facebook.com/sitetour/chat.php

Click on the PIDGIN and it will show you all the settings needed.

STEP 3

Now click on account and enable account, the one you newly created. Now you can use this program to chat with the facebook friends. If you like one messenger for all then you can add account for all other services like msn, yahoo, gtalk etc.

If you like to use other programs like ichat or Adium then here are the settings.

iChat

   1. Go to the iChat menu and select "Preferences."
   2. From the "Accounts" tab, click the "+" and select the following settings:
      ? Account Type: Jabber
      ? Account Name: your Facebook [email protected]
      ? Password: your Facebook password
   3. Click down to server options and select the following settings:
      ? Server: chat.facebook.com
      ? Port: 5222
      ? Uncheck "Use SSL"

Adium

   1. Go to the Adium menu and select "Preferences."
   2. From the "Accounts" tab, click the "+" and select "Jabber" from the drop-down menu. Fill in the following information:
      ? Jabber ID: your Facebook [email protected]
      ? Password: your Facebook password

%d bloggers like this: