[Solved] Breaking Nepali Characters-Words in Indesign

There has always been issues for Nepali font while designing for print. It isn’t a issue for those who work with?Unicode? but for those who work with Nepali fonts i.e Preeti, Kantipur or any another Nepali font its really frustrating to work with programs. As the programs are build in west where there is less or no concern and testing for the fonts like Nepali, ?we have to figure it out by ourselves until they make the program compatible for fonts. But it is less likely as English is the major international Language and for the rest there is Unicode to meet the purpose so the problem is yet to stick for years.

In this article I am writing about the breaking words in Nepali. Indesign predecessor like Pagemaker had the issue of breaking the “PURNABIRAM” and other few words like /. But in Indesign there is serious issue of breaking the words in almost every symbol i.e (“[“, “{“, “/” etc). The programs such as word, freehand, pagemaker does not have those issues as far as I know (correct me If I am wrong). I haven’t used Illustrator or Coreldraw for the desktop publishing work (that is for desktop publishing work using Nepali font) as of know so not talking about those programs. Since Freehand and pagemaker has become history , I decided to layout a Nepali and English (font) mixed magazine in Indesign.

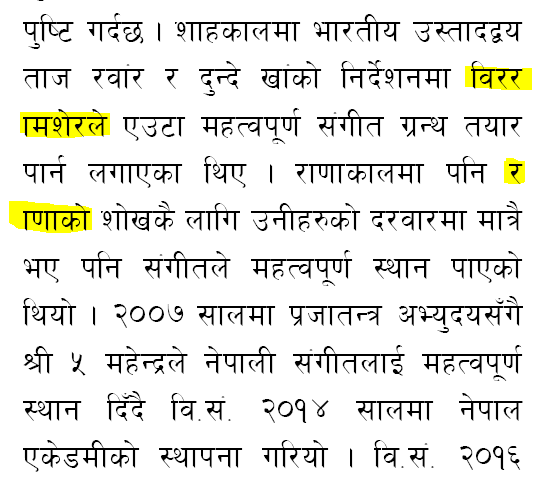
Soon after using The Indesign I noticed that the Nepali words and characters were breaking unnecessarily.

Capture

If I were to work with few paragraph I would select no break from the character tab or palate (Whatever it’s called). But Since I had to work with pages of Nepali text I had to figure something out. Other wise I had to select each word that was breaking and select nobreak for each one of them. After Searching briefly and no luck (not finding good solution, also i didn’t have time to keep searching for the iss), I took a rest for a while and finally figured out a way to tackle this problem.

THE SOLUTION

In page maker when the full stop in Nepali font broke apart in two lines we would find and replace the text with the non-breaking space and a full stop. Similarly in Indesign too, we would use the same technique for the breaking full stop. I will write in points about things to do to prevent Nepali words from breaking

1. First un-check Hyphenate in Paragraph as it adds unnecessary hyphen in Nepali words.hyphenate

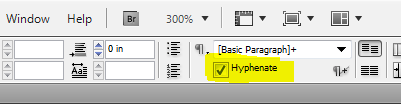
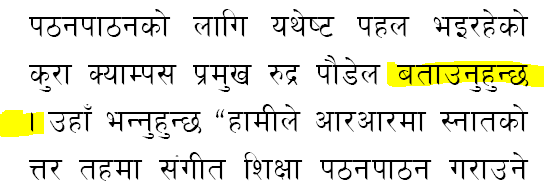
2. For breaking “PURNABIRAM” shown below in the image, ?use find and change?dialogue. In find type “space”+”fullstop”( .) and replace with regular expression “^S”+”.”(Pagemaker user must be familiar with this). This adds a non breaking space right before a fullstop (period) which prevents from breaking the “PURNABIRAM” as highlighted in the image.non-breaking fullstopbreaking space

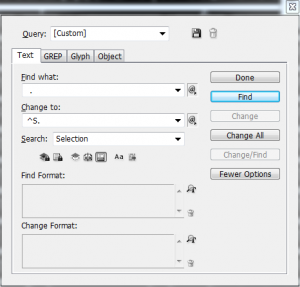
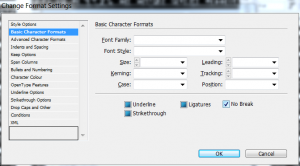
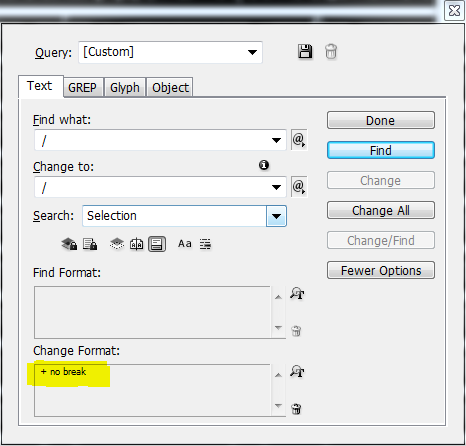
3. For rest of the breaking words as shown in the very first image, we have to find and replace every symbol with no-break. For example?? is on of the frequent character that breaks the word. So find “/” and replace it with “/” except in the change format?click the “Magnifying glass with T” icon. Which produces the change format setting dialogue. and under basic Character formats, check the no Break.

Upon clicking “OK” you will see that + no break appears on Change Format. Find and replace all. This will resolve all the breaking words that has / or ?? in Nepali.

no-break

no-break highlight4. This step would be to repeat the step 3 until you finish finding and replacing all the symbol characters in English. i.e Find and replace all the characters like { ? ; ? ‘ ? \ ?| ? } ? [ ? ] ?( ) with the same character with no break attribute in change format.

This should resolve the breaking word issue while working with Nepali characters.

P.S: I don’t know if there is another way to tackle this problem if there is any I certainly would like to know. I hope this was helpful to those who are and were having ?this issue.

How to setup WordPress in 000webhost using ftp client

If you have registered a domain and now want a perfect website for blogging then wordpress is the right choice for starters(in my personal opinion).

There are many paid hosting sites out there but if you want your website up and running without spending money on webhost then 000webhost is just good enough to begin with. In this post I will be telling how to setup wordpress in 000webhost server using the FTP clients like filezilla or fireftp. I will be using fireftp which is a addon for mozilla firefox. I also used filezilla but if found fireftp was good for me but you can use any ftp clients out there.

Prerequisite

  1. Register your domain. For information about registering your .com.np visit my other post http://www.surendrashrestha.com.np/register-your-personal-np-domain-for-free
  2. Sign up for free webhosting on http://www.000webhost.com/
  3. Download filezilla, if you use mozilla firefox then search for fireftp addon for your mozilla firefox browser.
  4. Download the latest version of the wordpress from http://www.wordpress.org/ and unzip.

Step by step guide

1. Login to your 000webhost account.

2. After login select create new account

image

3. Enter your registered domain name instead of example.com.np eg. surendrashrestha.com.np and choose the password as you like and click setup new account.

image

4. Upon completing the above step you should get the message like this. Now click Back to accounts list.

image

5. Now click the Go to CPanel

image

6. Now Click view account Details.

Read this if you are getting the below alert message

Now if you are getting the following error message then it means the domain is not pointing to the 000webhost name server. You have to point the dns(domain name system) server to the 000webhost. If you already have used the nameservers to ns01.000webhost.com and ns02.000webhost.com for your domain recently then you have to wait 24-28 hours. If it still shows the message then double check the nameserver name and type it exactly as it says, once I mistyped the domain nameservers as ns1.000webhost.com make sure you haven?t done the same mistakes.

image

7. Note down the ftp details the password will be the same as the password you used in the step 3. After noting down the details Click Enter the control panel.

image

8. Now click The My sql icon under software/services

image

9. Now you need to create the database for the wordpress. Fill up the form as you wish. After filling the form click create database.

You will be greeted with the information as below. Now you need to note down all the information carefully. You will need this information to setup your wordpress.

image


10. Now locate your wordpress folder the place where you downloaded the wodpress and unzipped it.

Open the wordpress folder on your computer.

Open the file wp-config-sample.php in notepad.

The file should have the content as below

// ** MySQL settings – You can get this info from your web host ** //
/** The name of the database for WordPress */
define(‘DB_NAME’, ‘database_name_here‘);

/** MySQL database username */
define(‘DB_USER’, ‘username_here‘);

/** MySQL database password */
define(‘DB_PASSWORD’, ‘password_here’);

/** MySQL hostname */
define(‘DB_HOST’, ‘localhost‘);

/** Database Charset to use in creating database tables. */
define(‘DB_CHARSET’, ‘utf8’);

/** The Database Collate type. Don’t change this if in doubt. */
define(‘DB_COLLATE’, ”);

Now you only need to edit the information that are marked red. Just fill up the red words with the information you noted in step 9.

  • Replace database_name_here with a5817322_wp (And of course you need to type your own information, the one you have noted down not the one I write here).
  • Replace username_here with a5817322_suren
  • Replace password_here with surendra123..
  • And finally replace localhost with mysql12.000webhost.com.

Double check the information you filled and save changes to the file.

Now rename the file to just wp-config.php

11. Now open the fireftp from mozilla or open the filezilla. Filezilla user are on there own?. sorry folks, but the overall thing is just the same I guess you should easily be able to setup anyway.

On firebug click create new account.

  • Use the information from step 7.
  • use ftp hostname from step 7 as host.
  • use ftp username from step 7 as login.
  • use ftp password from step 7 as password.

Click ok

image

12. Now connect to the FTP server using connect in the firebug.

  • If everything goes nicely till here then you should be successful to connect and the the files on your servers should be listed on the right pane and the left pane you can browse the files on your computer which you can push it to the server.
  • On right pane double click public_html. There will be a file named default.php.
  • Simply delete the file.
  • Now on the right pane navigate to the folder where you downloaded wordpress and unzipped.

image


  • Select all files on the left pane and right click and select upload or use the right arrow key to push files to the server. Now the uploading the files to the server takes time depending upon the speed of your internet. Be patient and make sure you transfer all files to the server. Incomplete transfer may cause problems to your site.

13. After successfully uploading all your files to the server it time to launch your website. Type the url of your site on the browser i.e www.example.com.np. Now keep your hands crossed and hope everything goes well. If you are following everything properly then you should get what I get on the browser.

image


14. Now fill up the information as asked by the wordpress and click install wordpress.

15. This is the end of this post. Now login to your wordpress admin and see what you can do. I am sure you will be able to find a nice theme and start blogging. Read the tutorials and documentation provided by the wordpress.

If you are looking for the cheap hosting, this might be helpful

The Best Cheap Web Hosting Providers: Getting the Best for Less

I hope this was useful. Good luck.

Use you android phone as wireless receiver for desktop computers

If you are using your android phone to browse internet via wireless than you can convert it into wireless receiver to browse the internet on your pc that does not have a wireless device. This is very useful if you have a wireless connection around you and want to browse the internet on your more comfortable Desktop PC.


[This can only be done on devices having android 2.2 or above.]

The trick is simple, First connect your device to wifi then just follow the steps below to use your android as a wireless receiver.

Step 1:

Go to settings and select wireless and networks

SC20111216-105113

Step 2:

Select Tethering and portable hotspot

SC20111216-105124

Step 3:

Check USB tethering

SC20111216-105142

There will be new Local Area Connection on your computer and connected to it. Now if you can browse the internet via wifi on you device then you can browse internet on your computer.

How to use Android Phones as a USB mass storage device

I don?t know about many phones and how the usb mass storage option works on others but if you are having problem using your android phone as usb mass storage then read through this article.

In my Samsung Galaxy POP(GT-S5570) it bugged me a lot while using it as a usb mass storage device. And also in some other android I had to go through the same process to use it as a usb mass storage.

When you connect your android mobile phone via data cable I didn?t get any option to use it as a pen drive or usb mass storage. If I had drivers installed then I could get the message usb debugging connected. If the driver is installed on the computer you connected your android device, then you can see the usb icon at the top left along with the droid logo. If you pull down you can see the option USB connected, Select to copy files to/from your computer. If selected you can get the option to turn on USB storage and you can use it as a usb mass storage.

But if you are in others computer i.e there is no driver installed for you device then you have to go through the process below.

  1. Connect your device with the data cable.
  2. Go to your device settings.
  3. Select Applications
  4. Select the Development option
  5. Uncheck the USB debugging.
  6. Make sure the usb debugging is unchecked.
  7. Then you should get the option to Turn on USB storage.
  8. Select it and then you can use your phone as the usb storage device

Get skype on android phones(Galaxy Pop)

This post is for those who are using android phone on our country (Nepal), because Skype is not available directly via android market. Also this will be helpful for those who are unable to install skype or skype is not working on android phones like galaxy pop.

It seems that Skype is now available locally in the android market for Nepal. Cheers!


*****************************POST UPDATE***********************

If you want to follow the rest of the post then you can go through it. But i figured out alternate method to download skype and other similar programs directly on mobile.

To follow up for this procedures, your phone needs to be rooted. I used superoneclick to root my phone. Please search google for the superoneclick and read the documentations and instructions carefully before you try to root your phone. Once your phone is rooted, download the market enabler software on your mobile fromhttp://code.google.com/p/market-enabler/. Once you get the software install it on your mobile and you can fake your provider to US-verizon or others. Once you fake it you can search for the skype and it will be visible on the market.

********************************************************************************


Recently I have been frustrated by not being able to use Skype on my android phone(samsung galaxy pop). The android market is country specific and will only show applications that are available for the specific region or country. So the skype was not listed on the market to download it from there. So I went to search for alternate location to download the skype and found some links. But when I installed the skype it gave the error message:

Sorry!
The application Skype (process com.skype.raider)has stopped unexpectedly. Please try again.

This was a huge frustration after searching skype for so long and installing, and it does not work. I did some search about the problem and found out that the error was caused because the phone was not supported as it has low screen resolution. (SRC:http://forum.skype.com/index.php?showtopic=740203)

So it seems that the newer release of skype is not supported for our sets. So I searched for the older versions and found some.

I?ve Got the Skype 1.0.0.831 installed on my phone and it is working well. It also supports the voice calls and hasn?t shown any error message. I didn?t install other versions and don?t know if it works or not. You can try other versions if the skype 1.0.0.831 is not working.

Skype 1.0.0.831 (Working on my Samsung Galaxy POP with voice calls)

skype apk v1.0.0.614

skype apk v1.0.0.538

Skype (This is the newer version that did not work and gave the above error message, but might work for the handset having higher screen resolution; mine was 240 x 320 pixels)

Please let me know if the links are ok. If the links are dead I will host the files myself.

%d bloggers like this: